Apple Shortcuts App
Shortcuts
The "Shortcuts" app can be used to automate a wide range of work steps under MacOS and iOS.
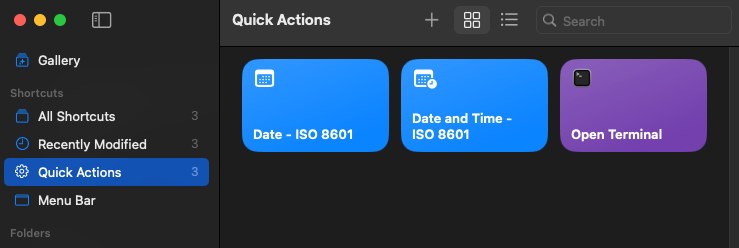
The interface shows the categories and folders on the left and the shortcuts they contain on the right. At the top right, the plus symbol can be used to create a new shortcut, change the view and search for saved shortcuts.
Predefined shortcuts can be searched for and added via the "Gallery" at the top left of the window. Under "Shortcuts", the existing shortcuts are sorted into several categories. "All Shortcuts" contains all saved shortcuts, regardless of type. "Recently Modified" contains the most recently modified shortcuts. "Quick Actions" contains all shortcuts that are to be displayed in a program menu under "Services" or in the "Quick Actions" context menu of the Finder. The "Menu Bar" lists the shortcuts that are displayed under the shortcuts icon in the menu bar.
To create a new shortcut, first select "All Shortcuts" and then the plus symbol in the toolbar. If you are in the "Quick Actions" or "Menu Bar" folder when creating a shortcut, the respective shortcut type is preset. This can be changed in the shortcut details. It is also possible to move a shortcut between folders or categories using drag and drop.
A window for creating a new shortcut is displayed. The title can be freely selected in the title bar of the window and can also be changed later. The possible actions are listed on the right-hand side. Entering a search term makes it much easier to find the required actions. The actions to be executed are displayed on the left-hand side of the window. The desired actions can be transferred from the right-hand side by double-clicking or using drag and drop. The actions are executed from top to bottom, with the result of one action being passed on to the next.
Additional settings are possible for most actions, which can be accessed via the links (in blue on the screenshots). Additional options can sometimes also be opened by clicking on "Show More" on the right-hand side of an action.
At the top right-hand side, the view can be changed using the two icons "Action Library" and "Shortcut Details" (circled "i" icon). Among other things, the shortcut details determine where the shortcut should be displayed. Possible settings are:
- Pin in Menu Bar
- The shortcut is displayed under the shortcuts icon in the menu bar.
- Show in Share Sheet
- The shortcut is available via the "Share" button.
- Receive What's On Screen
- With this setting, the shortcut can receive displayed data from other supported apps such as Siri, Maps or Photos.
- Use as Quick Action
- The shortcut should be available in the menu of an app or in the context menu of the Finder. This item is automatically selected if one of the three following items requires it. Depending on the settings selected, an action is automatically added at the top in which the data source can be specified.
- Finder
- The shortcut is available via the "Quick Actions" context menu of the Finder.
- Services Menu
- The shortcut is displayed in the program menu (the menu item to the right of the Apple logo with the program name) under "Services".
If this item is selected, a keyboard shortcut can be defined using the "Add Keyboard Shortcut" button. Next to the text "Run with", a text field then has the input focus. Now all you have to do is press the desired key combination on the keyboard.
- Provide Output
- The shortcut outputs data, such as text in an editor or as a result for another shortcut. Another action is automatically inserted at the end.
- Show on Apple Watch
- Damit kann der Shortcut auf einer Apple Watch ausgeführt werden.
Note:
When importing shortcuts, whether from a file or via an iCloud link, some settings under "Details" are not applied. For example, the display in the Finder is never selected, even though it is selected in the original shortcut. The defined keyboard shortcut is also not applied. The display on the Apple Watch, on the other hand, is always selected.
The following examples explain in more detail how to create a shortcut.
Examples
You can find the following examples and other shortcuts in the Apple Shortcuts Collection.
Date in the ISO 8601 format
This example is intended to insert the current date in ISO 8601 format (e.g. "2025-03-23") as text in an application.
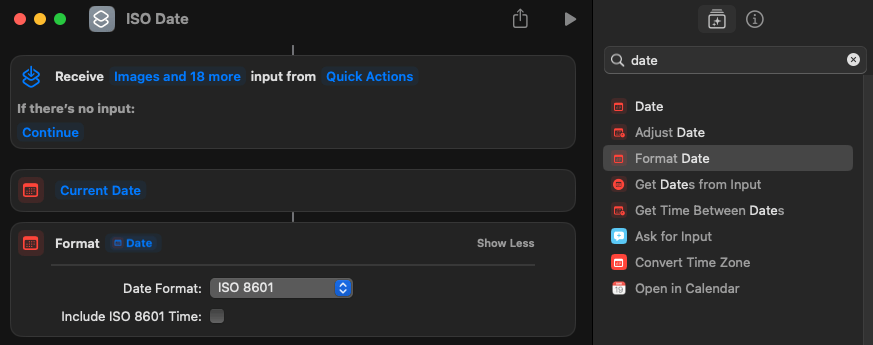
If you search for "date", you will find the "Date" action in the result, which can be added to the left-hand area of the window by double-clicking or using drag & drop. The "Format Date" action is then also added.
In the actions, the "Current Date" and "Date" links enable further settings for the source data. However, these are not required for this example.
Under "Format Date", click on the text "Show More" to display further settings.
The "ISO 8601" format is selected under "Date Format". Optionally, the time can also be output if desired.
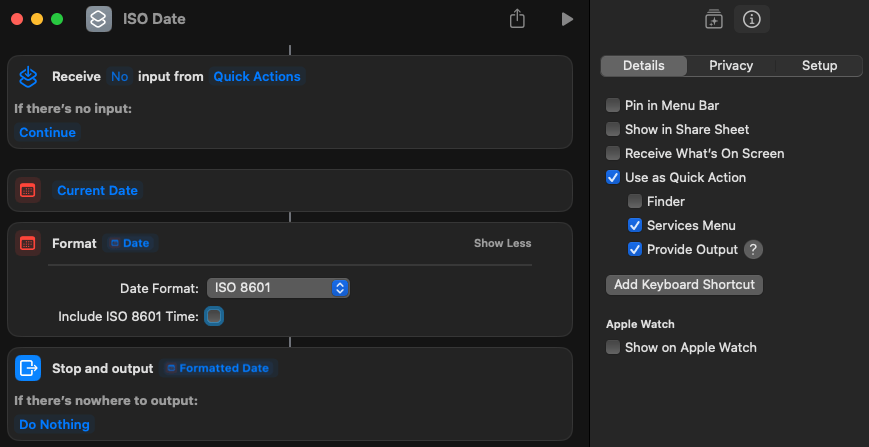
In the shortcut details, select the items "Services Menu" ("Use as Quick Action" is automatically selected) and "Provide Output". With this selection, the shortcut is displayed in the menu of applications.
The settings for the top and bottom entries, which determine the data source and destination, are now defined. In the top entry ("Received ..."), click on the text "Images and ... more" and deselect all list entries, as these are not required. Finally, in the bottom entry ("Stop and output ..."), click on "Do Nothing" to select the entry "Copy to Clipboard" to copy the date if no text output is possible.
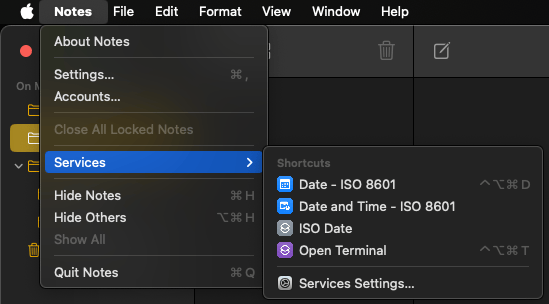
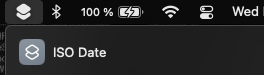
The shortcut is now available in the program menu under "Services". Optionally, a key combination can also be selected as a hotkey.
If the shortcut is to be displayed in the menu of the shortcuts icon in the right-hand area of the menu bar, the "Pin in Menu Bar" item must be selected in the shortcut details. Alternatively, the shortcut can also be dragged and dropped into the "Menu Bar" category.
If a shortcut should not be displayed in the program menu, it can be removed from the "Quick Actions" category using the "Remove from Quick Actions" context menu item. To remove a shortcut from the program menu without deleting it completely, the shortcut only needs to be removed from the "Quick Actions" and "Menu Bar" categories using "Remove from ..." from the context menu. The shortcut details are automatically changed accordingly. It can then still be found under "All Shortcuts".
Run Terminal with a keyboard shortcut
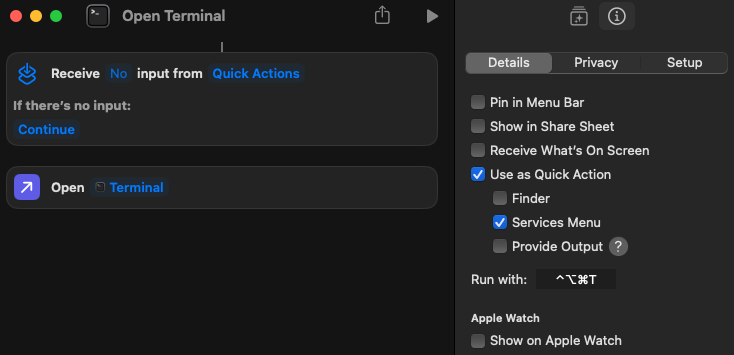
The option of assigning a key combination to a shortcut has already been mentioned. Here is another example that opens a terminal window with a system-wide key combination. The creation works as in the first example, except that "Open App" is used as the action and "Terminal" is selected as the app.
The shortcut is also displayed in the Services menu of applications. However, this is a prerequisite for being able to assign a keyboard shortcut at all. The desired key combination is defined via the "Add Keyboard Shortcut" button, e.g. ⌃ Ctrl+⌥ Opt+⌘ Cmd+T.
Copy file paths in Finder
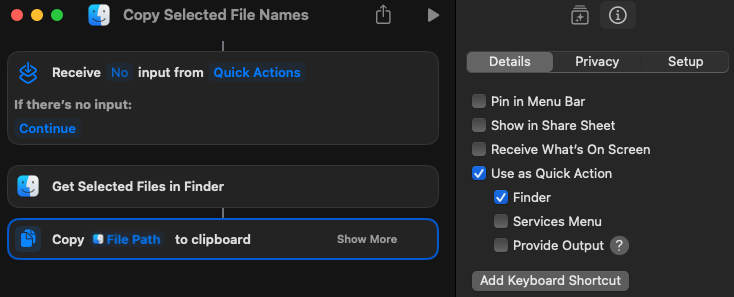
A very simple shortcut is all you need to copy the complete file paths of all selected files and folders in the Finder. It only consists of the two actions "Get Selected Files in Finder" and "Copy to Clipboard". In "Copy to Clipboard", the "File" link must be used to set the "File Path" entry under "Get" so that only the full file path is copied and not the file itself. The "Finder" item is activated in the details. The "Use as Quick Action" box is then automatically checked.
The shortcut is now available in the "Quick Actions" context menu.
This shortcut is well suited for using file paths in lists, tables, e-mails and the like. If the paths are to be transferred as parameters to a terminal command, the ⌥ Opt+⌘ Cmd+C key combination can be pressed in the Finder. Any required quotation marks are then already included.
Tip: You can find more shortcuts in the Apple Shortcuts Collection.
Were the free content on my website helpful for you?
Support the further free publication with a donation via PayPal.